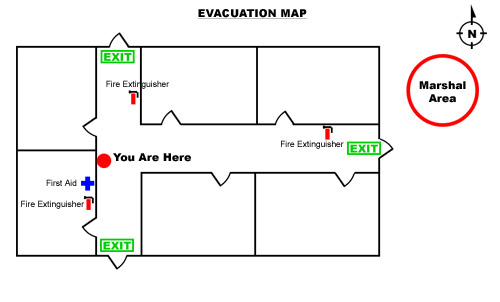
Having an evacuation map is not just a good idea, it’s required by law to meet most local fire codes. And there are a number of keys and best practices for making a proper evacuation map …
1. Keep it Simple
This is a case where less detail is better. The faster and easier that someone can look at your map and find out what they need to know, the better. Calm thinking goes out the window during a crisis, and the goal here is to save lives, so only the important elements need to be displayed.
For the map to provide instant clarity during a disasterous event, use simple black and white lines to show the architectural layout (walls, doors, etc). Highlight important elements on the map (exit points, fire extinguisher locations, etc) in color. These important elements should be shown using both a simple graphic and a text label.
2. Elements to Show on Your Evacuation Map
- The basic layout of the property including walls and doors. Show the outside of the property as well because you need to indicate a marshal or congregation area for people to go to in the event of an emergency.
- The starting point. This is the location of the map (and therefore the person reading it). Make a large red dot and label it “You Are Here”.
- The compass. Show a basic compass in the corner of the map indicating the direction of North with the letter “N”.
- Exit points. Highlight the exterior doors and label them as “Exit” on your map. These exit points need to be clear and accessible at all times. They also should not be locked in a way that requires a key to open them when exiting.
- The marshal area. This is the place where evacuees should meet. It should be a safe distance away from the building to provide adequate protection from fire and any onsite hazards such as chemicals or explosive materials. Draw the marshal area on your map using a red circle and label it “Marshal Area”.
- Fire extinguishers. Use a small fire extinguisher icon and the label “Fire Extinguisher” to show the location of all the extinguishers on your map. If there’s a firefighting station on the property, show that as well and label it “Fire Station”.
- First aid kits and stations. Use a blue cross and the appropriate labels to show the location of first aid kits and first aid rooms.
- Other important elements. You can also show certain things such as eyewash stations, stairways that lead out of the building, and other safety stations that might be specific to your industry or business.
3. Display the Maps in High Traffic Areas
For an evacuation map to be useful, it has to be visible. Display it on a bare wall in easy view of the surrounding area. If you have multiple maps, make a different map for each diplay location with a unique “You Are Here” element.
It’s also a good idea to orient each map (turn it) in a way that makes sense to the display location so users can quickly see where they are and how to exit. The best way to understand this is, if you’re facing the map and you remove it from the wall and lay it flat, the elements to the left of you will be to the left of your location marked on the map.
4. Tools for Creating Your Map
The easiest way to create an evacuation map is to use simple pen and paper. If you do this, use fine-tipped markers for the colored elements. You can also use the drawing tools in a program like Microsoft Word or a drawing program like Photoshop.
An ordinary picture frame will do for displaying your maps, and you can get “frameless” picture frames at any stationary store that look clean and professional.
Here’s a sample evacuation map …
